.ico)

Electricity
Carrier
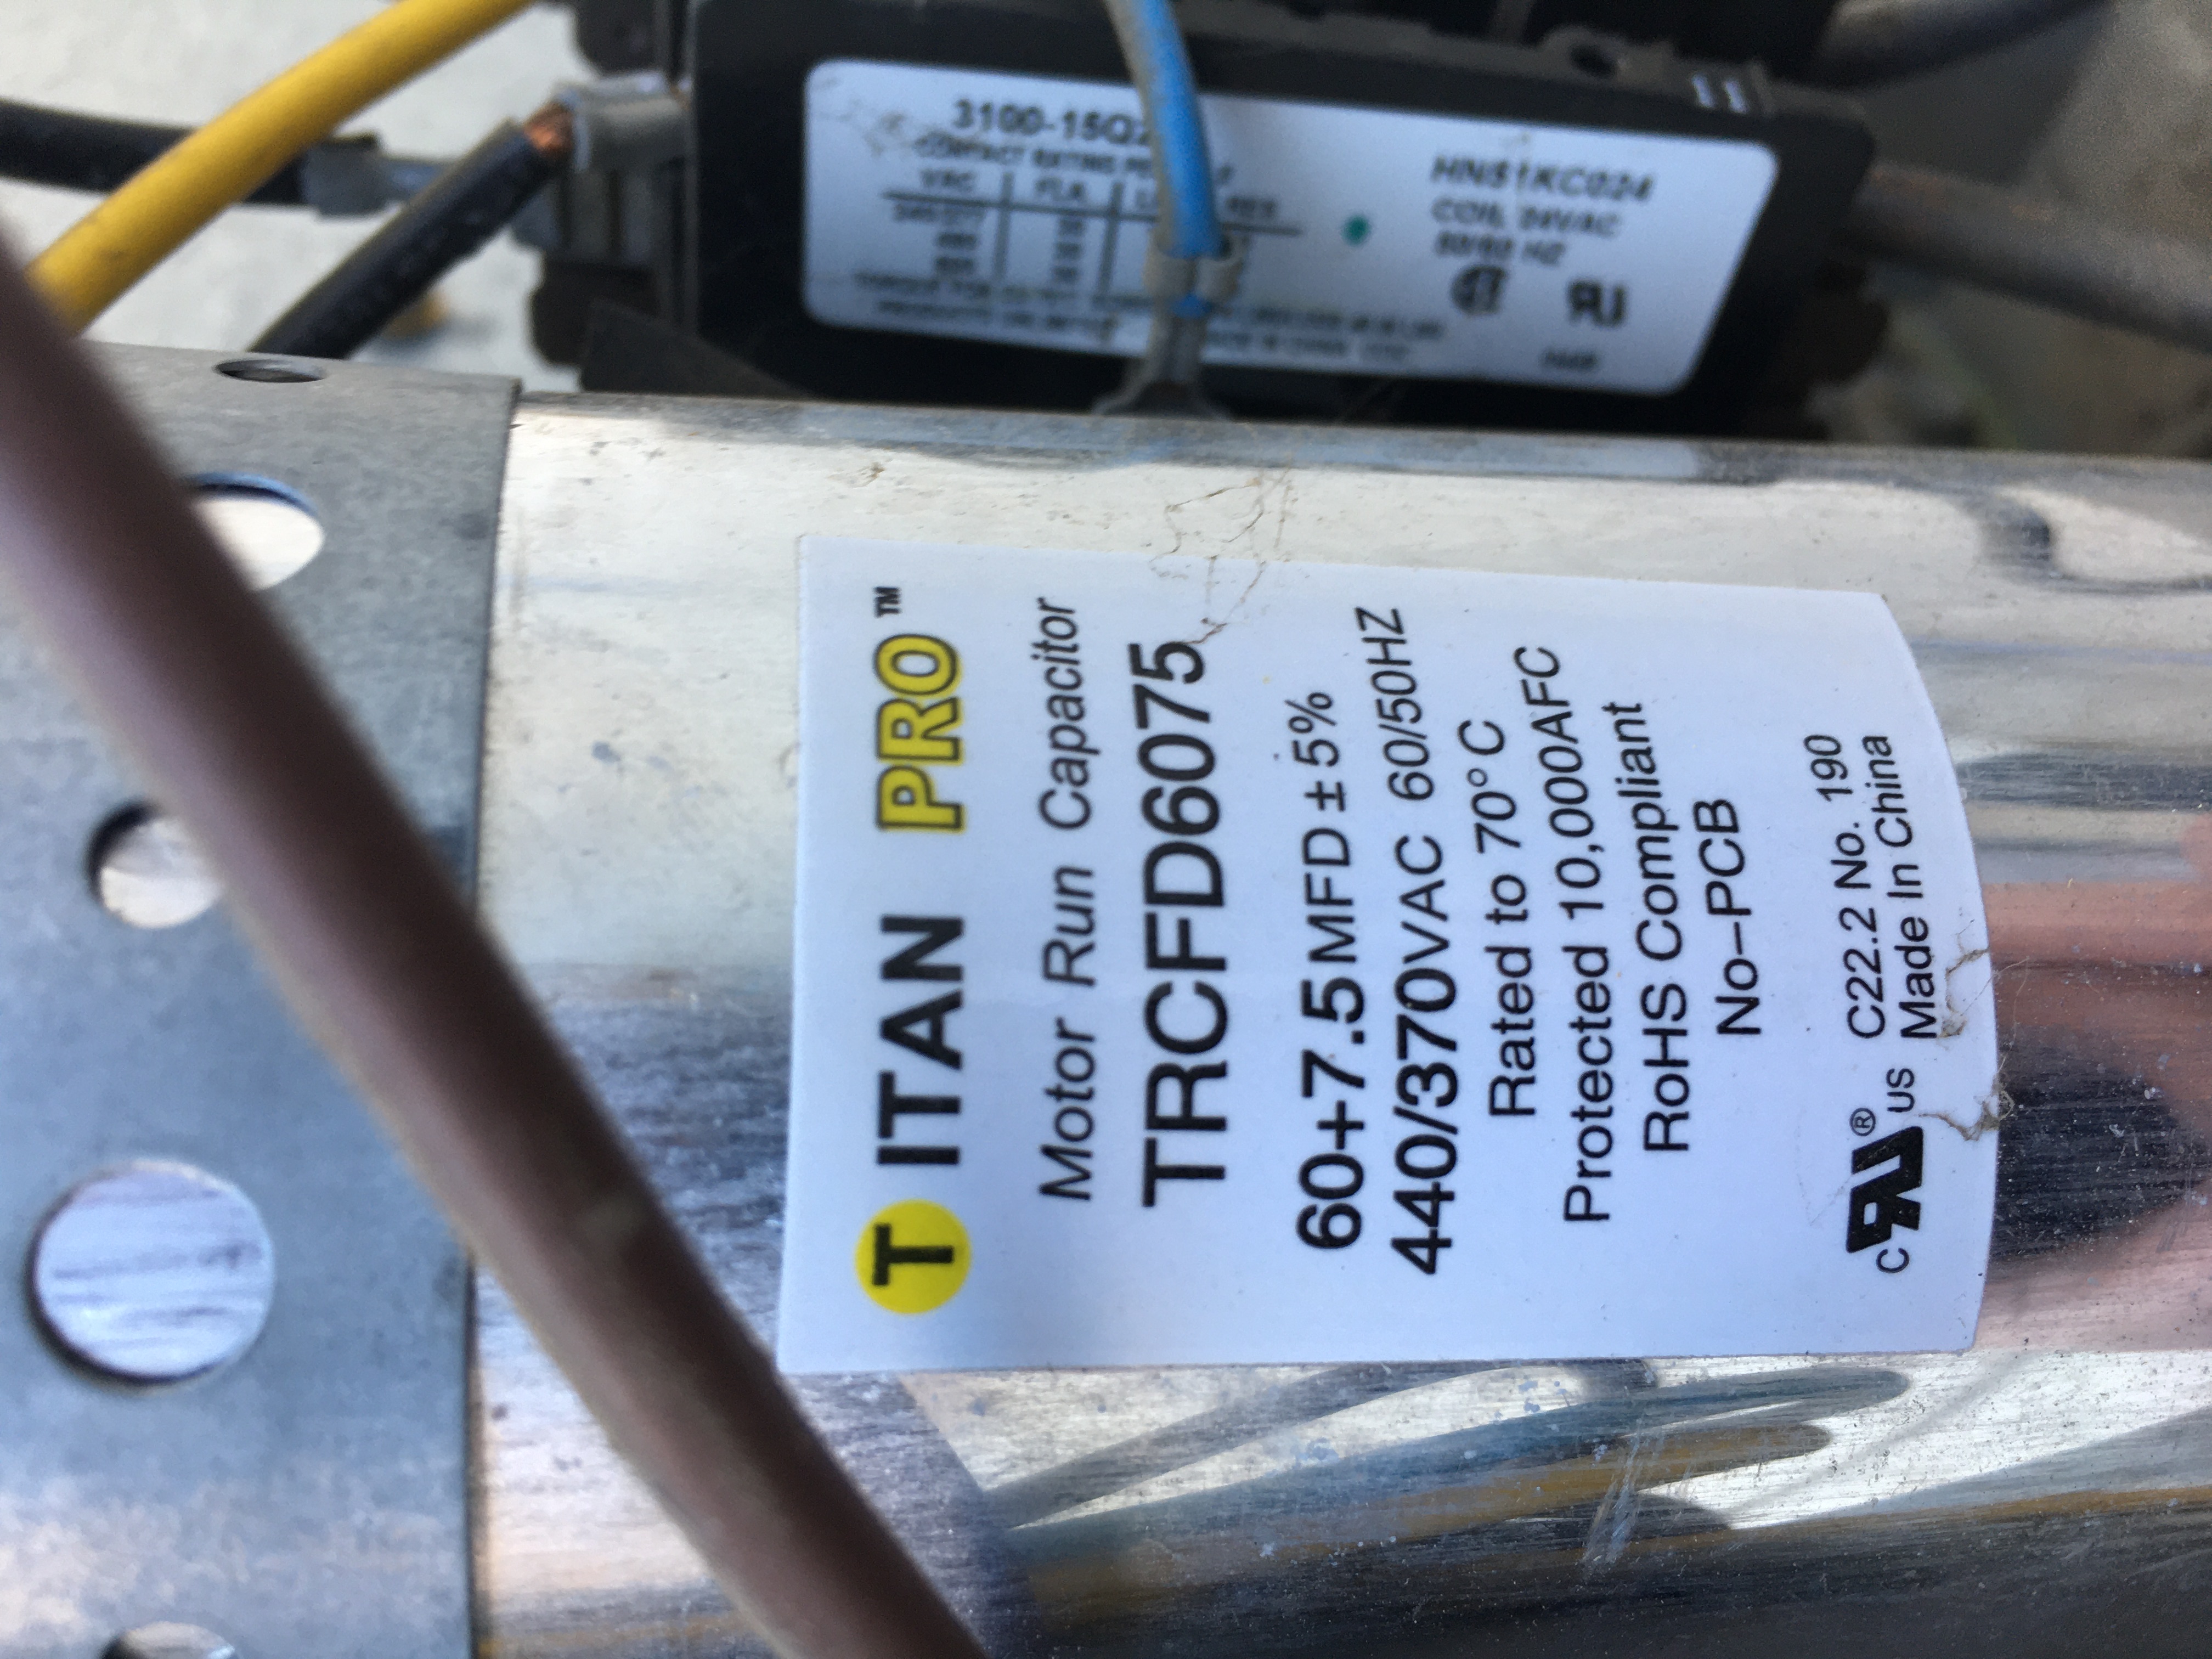
- Model Number: 38CKC048370
- Documentation
- Videos
Sunrun
On Monday, 1/26/2015, I met with Kevin Fitzgerald of Sunrun to discuss my solar options. The details of that meeting are not available.
On 8/20/2019, I met with Austin Saling of Sunrun to discuss my solar options.
System Details
- 4.64 kW DC Solar System
- 16 REC Solar Panels with 1 Ginlong Inverter
- Generate 7,296 kWh of electricity in Year 1
- Offset 93% of current electricity usage
- Estimated Energy Rate (SMUD): $0.159 per kWh
- Estimated Energy Rate (Sunrun): $0.088 per kWh
- Can meet 93% of energy needs for $12,196
Aztec
On 1/8/2015, I reached out to Aztec for a quote.
Capital City Solar
On 1/13/2015, I met with Andy Russell of Capital City Solar to discuss my solar options.
System Details
- Year 1 Estimated Production: 11,611 KWH
- 8.50 kW (DC), 7.5 kW (AC) SunPower System
- 26 x SunPower E20/327 Solar Panels
- Solar Mount Mounting System
- 1 x Sunny Boy 5000TL-US-22 - 240v (SPR-5002m)
- 1 x Sunny Boy 3000TL-US-22 - 240v (SPR-3002m)
Proposed Economics
- System Cost: $37,914
- Estimated Rebate: $500
- Estimated Federal Tax Credit: $11,224
- Estimated Net System Cost: $26,190
- Estimated SunPower cost per kWh: $0.12
- Estimated Year 1 Return: 7.00%
Valley Solar
On 1/12/2015, I reached out to Aztec for a quote.
Arlyn and I moved into our current home in November of 2011. Since then, I have tracked our energy usage. The graph below shows our kilowatt usage since that time.
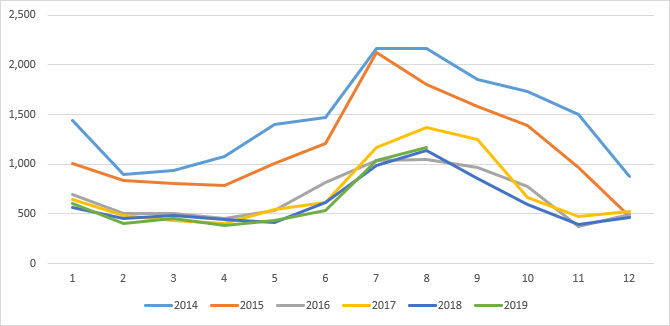
Annually, our usage looks like this:
- 2011: 1,504 Kilowatts (Partial year)
- 2012: 16,735 Kilowatts
- 2013: 18,464 Kilowatts
- 2014: 17,523 Kilowatts
- 2015: 13,978 Kilowatts
- 2016: 8,195 Kilowatts
- 2017: 8,573 Kilowatts
- 2018: 7,400 Kilowatts
- 2019: 5,017 Kilowatts (Partial year)
There were some significant events that must be noted here.
- November 2013: Dad's bedroom was moved from the 2nd floor to the first floor.
- May 2014: Installed Solar Screens on West and South windows.
- January 2015: Energy report issued. Changes made to home systems.
- June - July 2015: Elyse used upstairs bedroom.
- October 27, 2015: Dad moved out.
- September 2016: Installed Solar Screens on East windows.
- July 2019: Amber uses upstairs bedroom.
 In January 14, 2015, we asked Apollo Energies Inc to perform an energy audit of the
house. The cost of analysis was $500.00. On January 20, 2015, we received
the report. This is the
energy report.
In January 14, 2015, we asked Apollo Energies Inc to perform an energy audit of the
house. The cost of analysis was $500.00. On January 20, 2015, we received
the report. This is the
energy report.
 Upon arriving at our home, Apollo Energies performed a gas leak check to
verify the integrity of the system. Two gas leaks were identified. I called
PG&E immediately to have them address the issue. PG&E sent someone out very
quickly. The first gas leak was near the gas meter on the south side of the
house. The second was in the attic in or near the heater. Both gas leaks
were repaired on the spot.
Upon arriving at our home, Apollo Energies performed a gas leak check to
verify the integrity of the system. Two gas leaks were identified. I called
PG&E immediately to have them address the issue. PG&E sent someone out very
quickly. The first gas leak was near the gas meter on the south side of the
house. The second was in the attic in or near the heater. Both gas leaks
were repaired on the spot.
 One of the recommendations in the report was the installation of new
thermostats. On February 7, 2015, the two thermostats were replaced. The
original thermostats, a couple of crusty Carrier, circa 1999-models, were
starting to show their age. So they were replaced by a couple of Honeywell
RTH9580 Wi-Fi enabled thermostats.
One of the recommendations in the report was the installation of new
thermostats. On February 7, 2015, the two thermostats were replaced. The
original thermostats, a couple of crusty Carrier, circa 1999-models, were
starting to show their age. So they were replaced by a couple of Honeywell
RTH9580 Wi-Fi enabled thermostats.
- Manufacturer: Honeywell
- Vendor: Amazon.com
- Website: Total Connect Comfort
- Downstairs Thermostat
- Model Number: RTH9585WF
- Install Date: 9/21/2020
- Cost: $160.80
- MAC ID: B8:2C:A0:9D:6C:AA
- MAC CRC: 2795
- Upstairs Thermostat
- Model Number: RTH9580WF
- Install Date: 2/7/2015
- Cost: $206.10
- MAC ID: 00:D0:2D:5E:3A:2F
- MAC CRC: E8C6
- Manuals
Another recommendation from the energy report was the weather sealing of the inside outlets. This included the light switches and the electrical plugs. The images in the report showed substantial temperature changes around the outlets. One way to stop this is the insulation of the outlets.
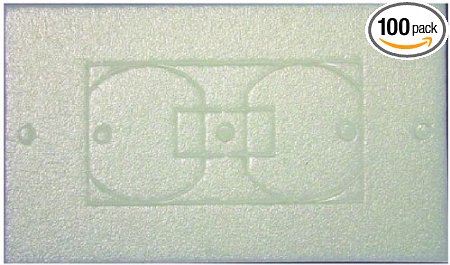 To start, we ordered these wall plate
insulation
gaskets from Amazon.
The box we ordered had 100 gaskets and this was enough for our house.
They were easy to use and could be used both for light switches and outlets.
The cost was about $18.99.
To start, we ordered these wall plate
insulation
gaskets from Amazon.
The box we ordered had 100 gaskets and this was enough for our house.
They were easy to use and could be used both for light switches and outlets.
The cost was about $18.99.
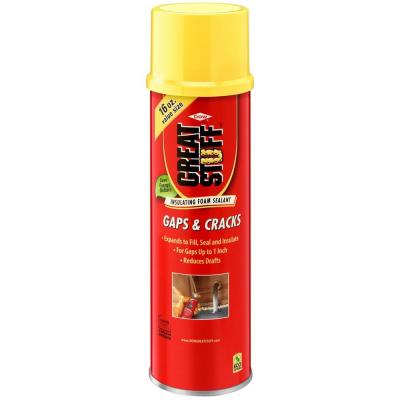 Before we got started, there was one more item we needed. We needed some
spray foam that we can inject in between the gaps and cracks that the gaskets
did not cover. The Home Depot has this spray bottle of foam called
Great Stuff. The cost was about $3.98. It comes with a
plastic tube that allows you direct where the foam goes. When we started
using the foam, we found the foam to be extremely sticky and tacky. If this
material gets on anything, wipe it up with a clean towel or rag immediately.
If it is not removed, it can remove paint, finishes, anything. It expands
when it hits the air and fills in spaces. After about an hour of drying
time, the foam become somewhat rubbery. It takes about 24 hours to fully
dry. Once it is dry, you can use a straight edge to trim any excess.
Before we got started, there was one more item we needed. We needed some
spray foam that we can inject in between the gaps and cracks that the gaskets
did not cover. The Home Depot has this spray bottle of foam called
Great Stuff. The cost was about $3.98. It comes with a
plastic tube that allows you direct where the foam goes. When we started
using the foam, we found the foam to be extremely sticky and tacky. If this
material gets on anything, wipe it up with a clean towel or rag immediately.
If it is not removed, it can remove paint, finishes, anything. It expands
when it hits the air and fills in spaces. After about an hour of drying
time, the foam become somewhat rubbery. It takes about 24 hours to fully
dry. Once it is dry, you can use a straight edge to trim any excess.
It took Arlyn and I about one weekend to do the entire house. We did everything. Outlets on outside walls...inside walls...everywhere. We finished the insulation project on March 29, 2016.
 When we bought the house in 2011, the one thing I noticed during the winter
months was the thermostats shutting down completely periodically. I would
wake up in the morning to find about 2 hours missing from the thermostats.
This seemed to occur only when the thermostats were set to Heat. I also
noticed that the amount of time the heater was actually one was very short.
In some cases, it would be only 30 seconds.
When we bought the house in 2011, the one thing I noticed during the winter
months was the thermostats shutting down completely periodically. I would
wake up in the morning to find about 2 hours missing from the thermostats.
This seemed to occur only when the thermostats were set to Heat. I also
noticed that the amount of time the heater was actually one was very short.
In some cases, it would be only 30 seconds.
I had an AirTek technician inspect the heater system on February 11, 2016. The technician inspected the heater system and found a large deposit of berries and nuts on a section of the heater. Apparently, birds or squirrels were entering into the attic space and leaving debris. When the heater system started a cycle of heating, a failsafe was tripped because it was heating too quickly. The debris that was left behind was keeping the heater from operating safely. When the failsafe engaged, it would shut down the heater (causing it to run for only short periods of time) and remove all power to all systems in the HVAC system (the thermostats seemed to lose time).
The technician removed the debris and checked to ensure the heater was cycling properly. The thermostats no longer lose time and the heater is heating much better now.
Over the last couple of months, the traffic going into the attic was substantial. Apollo Energies, PG&E and AirTek needed to gain access to the attic space.
There is a light switch in the attic. It was in the on-position. The light bulb was not illuminated. Conclusion? Bad Bulb. So I attempted to replace the bulb. When I began to unscrew the bad bulb, I discovered it was not screwed all the way. It was not on because it was not fully installed. So I screwed the old bulb tighter into the socket and it lit up. Problem solved...or so I thought.
After the last technician left the attic space, the switch was turned off and the bulb went out. The attic crawl space was closed and the technician left.
Approximately two hours later, the house was getting noticeably colder. The heater had not turned on since the technician left. I reentered the attic crawl space and turned on the light switch. The heater immediately started. And a discovery was made. The switch not only controlled the attic light, but it also controlled the heater.
 This was not normal. The attic light should not need to remain on to keep
the heater running. Whoever it was that physically built the house needed to
be address this issue. The home was built by D.R. Horton in 2005. I
contacted the local D.R. Horton local office and discussed the issue with
them. Thankfully, D.R. Horton agreed...it was a problem. This is the good
part. Although the house was about 10 years old and no longer under any
warranty, D.R. Horton sent somebody out to fix the problem. Kudos to D.R.
Horton.
This was not normal. The attic light should not need to remain on to keep
the heater running. Whoever it was that physically built the house needed to
be address this issue. The home was built by D.R. Horton in 2005. I
contacted the local D.R. Horton local office and discussed the issue with
them. Thankfully, D.R. Horton agreed...it was a problem. This is the good
part. Although the house was about 10 years old and no longer under any
warranty, D.R. Horton sent somebody out to fix the problem. Kudos to D.R.
Horton.
We have some rooms that we are not using all the time. Currently, three of our bedrooms are not being used. Normally, we would have these rooms open and we would be normally cooling or heating them like the rest of the house. But why? Why not shut down the rooms and seal them so that we don't need to cool or heat them.
Closing the vents and closing the door is not enough. The vents are not air tight and leak. The space under the door is large enough to allow air to occur. There had to be some way to seal up the vents and stop the air flow. Taping the vents with duct tape is not a solution. We wanted to open the rooms quickly and easily if they were needed for unexpected guests. Who want's to climb a ladder and cover the vents with tape or remove tape, depending on the situation. We needed a way to cover the vents quickly and easily.
 When the folks from Apollo performed their leak testing of the HVAC
system, they used these plastic covers that would slide up a string to cover
the vents quickly. No ladders were needed. They just placed a hook on the
vent and push a cover onto the vent. So I quickly went to the Vent Cap Systems
website around February 2015. I was disappointed to see that you had to
order the covers in lots of 10. This was too much. I only need three covers
and they were kinda pricey. Later, I returned to their website, hoping that
they saw the light and started selling the caps individually. I was
pleasantly surprised to see that they changed the practice of selling them
in lots of 10. I can buy them individually. So I warmed up my debit card
and made my purchase. Within a week, I had my three caps and Pole RAT
(required). And it works as advertised. All three bedroom are now closed
and 'sealed'.
When the folks from Apollo performed their leak testing of the HVAC
system, they used these plastic covers that would slide up a string to cover
the vents quickly. No ladders were needed. They just placed a hook on the
vent and push a cover onto the vent. So I quickly went to the Vent Cap Systems
website around February 2015. I was disappointed to see that you had to
order the covers in lots of 10. This was too much. I only need three covers
and they were kinda pricey. Later, I returned to their website, hoping that
they saw the light and started selling the caps individually. I was
pleasantly surprised to see that they changed the practice of selling them
in lots of 10. I can buy them individually. So I warmed up my debit card
and made my purchase. Within a week, I had my three caps and Pole RAT
(required). And it works as advertised. All three bedroom are now closed
and 'sealed'.
My time in Texas taught me the power of using solar screens. These things work.
In 2014, I contacted several companies to have solar screens installed on the windows that face south and west. I received a total of three estimates and I finally settled on Screen & Shade Solutions. Their price were the best and, to find out, the installation process was handled professionally.
On May 21, 2014, Screen & Shade Solutions installed eight screens on the south and west windows for $611.30. At the time, they used Suntex Suncreens. The frames were white 1" frames. The color was brown (80%).
On August 3, 2016, Screen & Shade Solutions installed screens on the east windows for $1,200.00. At the time, they used Suntex Suncreens. The frames were white 1" frames. The color was brown (80%).